Klem assembly instructions
How do you construct creative yet functional structures with the Klem connector? Klem offers a world of possibilities and the freedom to realize your ideas in any conceivable form! Assembly is very straightforward. Our helpful hints and tricks are provided for you here!
Connect and tighten
The panels are set up and positioned at the desired angles to each other. Two people are all you need for assembly.
Now a Klem connector with the screw loosened is pushed onto the edges. Additional connectors follow at maximum intervals of 90 cm.
With the central screw, the connector jaws are clamped to the panels using an Allen key. Done!

Building with panels and boards
Start with the essential elements for your structure: The panels and the Klem connectors.
Choose the panel material you prefer, as long as it has a high inherent rigidity and smooth, hard edges. From wood to glass to chipboard and delicate materials, everything with a panel thickness between 2 and 19 mm is possible.
Learn more in our guide for suitable panels.
Building with tubes and rods
Klem connectors securely connect tubes and rods as well. This opens up entirely new design possibilities. Matching silicone inserts are available for various tube diameters:
- Dual inserts are offered for tubes with a diameter of 20 mm (Klem) and 13 mm (Klem Mini)
- For 25 to 27 mm (Klem) and 15 to 17 mm (Klem Mini), the panel connector is used without inserts.


Variable angle range
The Klem connector allows a free angle range from 90° to 270°, enabling flexible designs with open and closed angles. Ideal for customized configurations and designs.

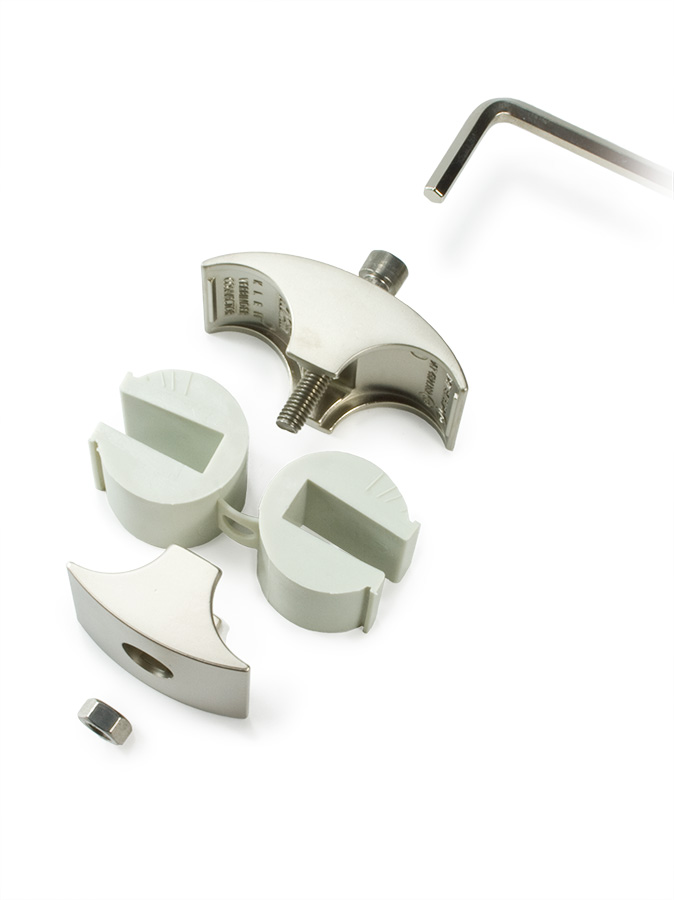
Clever insert sets
The duo castors are connected by a bar to prevent them from falling out. Make sure they are aligned correctly so that you can adjust the angle of the panels flexibly.

The front always looks smart
You can choose to screw the Klem connectors together with the screw and counter nut from the front or the back. Thus the screw always protrudes from the hidden side of the connector.

Tubes and panels
You can also connect tubes or rods to each other or to panels! There is a insert set for Klem for tubes with a diameter of 20 mm ± 1 mm and for Klem Mini for tubes with a diameter of 13 mm ± 1 mm. Without silicone insert, Klem tubes with 25 mm fit (Klem Mini: 20 mm).

Different thicknesses
You can switch from thick to thin sheets by cutting two insert sets of the corresponding sheet thicknesses and inserting two different roller halves into a Klem connector.

The same angle is required
The panels connected by the Klem must be aligned at the same angle to each other. This increases the stability of the construction and prevents material tension.

Front and rear
For straight walls (180° angle), you can also use two Klem front jaws. This makes your wall equally attractive from the front and the back.

Rubber as protection
If your panels or the floor are sensitive, you can clamp a halved insert set to the bottom of the panels as "cushioning".

Floor glides for leveling
They serve as spacers to the floor and at the same time protect the panel edges. This ensures stability and avoids direct contact with the floor.

Angle below 90°
With sheets of 10 mm thickness and below, an inclusion angle of 60° is even possible - ideal for triangular prisms.You also have this option with Klem Mini with sheets of 4 mm thickness and below.

Seamless installation
Seamless walls, i.e. wall surfaces without joints or gaps, are possible thanks to suitable recesses in the panels. Please also note the information on the clear width when using Klem.

Number of Klem connectors
For panel edges up to 2 meters, it is sufficient to use 2 Klem connectors. For longer panels, 3 connectors should be used for additional stability and to reduce bending of the panels.

Three- and two-dimensional
The Klem connector enables both three-dimensional and flat constructions.For right-angled structures, it can be set to exactly 90°, while flat arrangements can be realized with a 180° angle.
Thanks to the flexible angle adjustment, individual, freely adjustable angles are also possible, allowing the creation of a wide variety of shapes and structures.

Clearance for Klem
Gaps are created between the panels when they are joined with the Klem connector:
A = Clearance at 90°
- for 10 mm thick panel = 17 mm
- for 12 mm thick panel = 14 mm
- for 16 mm thick panel = 12 mm
- for 19 mm thick panel = 10 mm
B = Clearance at 180°
- for all panel thicknesses = 18 mm
Clearance for Klem Mini
Gaps are created between the panels when they are joined with the Klem Mini:
A = Clearance at 90°
- for 2 mm thick panel = 14 mm
- for 4 mm thick panel = 13 mm
- for 6 mm thick panel = 12 mm
- for 8 mm thick panel = 10 mm
B = Clearance at 180°
- for all panel thicknesses = 14 mm

The Klem connector - endless possibilities!
The video shows an exhibition stand realized with stable panels and Klem connectors - including partitions and showcases. Easy to assemble, transport and reassemble in different configurations. Klem is flexible in many areas and can be used (differently) again and again!
Let your imagination run wild: partition walls, partitions and room dividers are just the beginning. Platforms, reception counters and seating areas are also possible. And think of showcases, furniture, creative constructions and much more!